Detections
What is in SnapAttack's Detection Library?
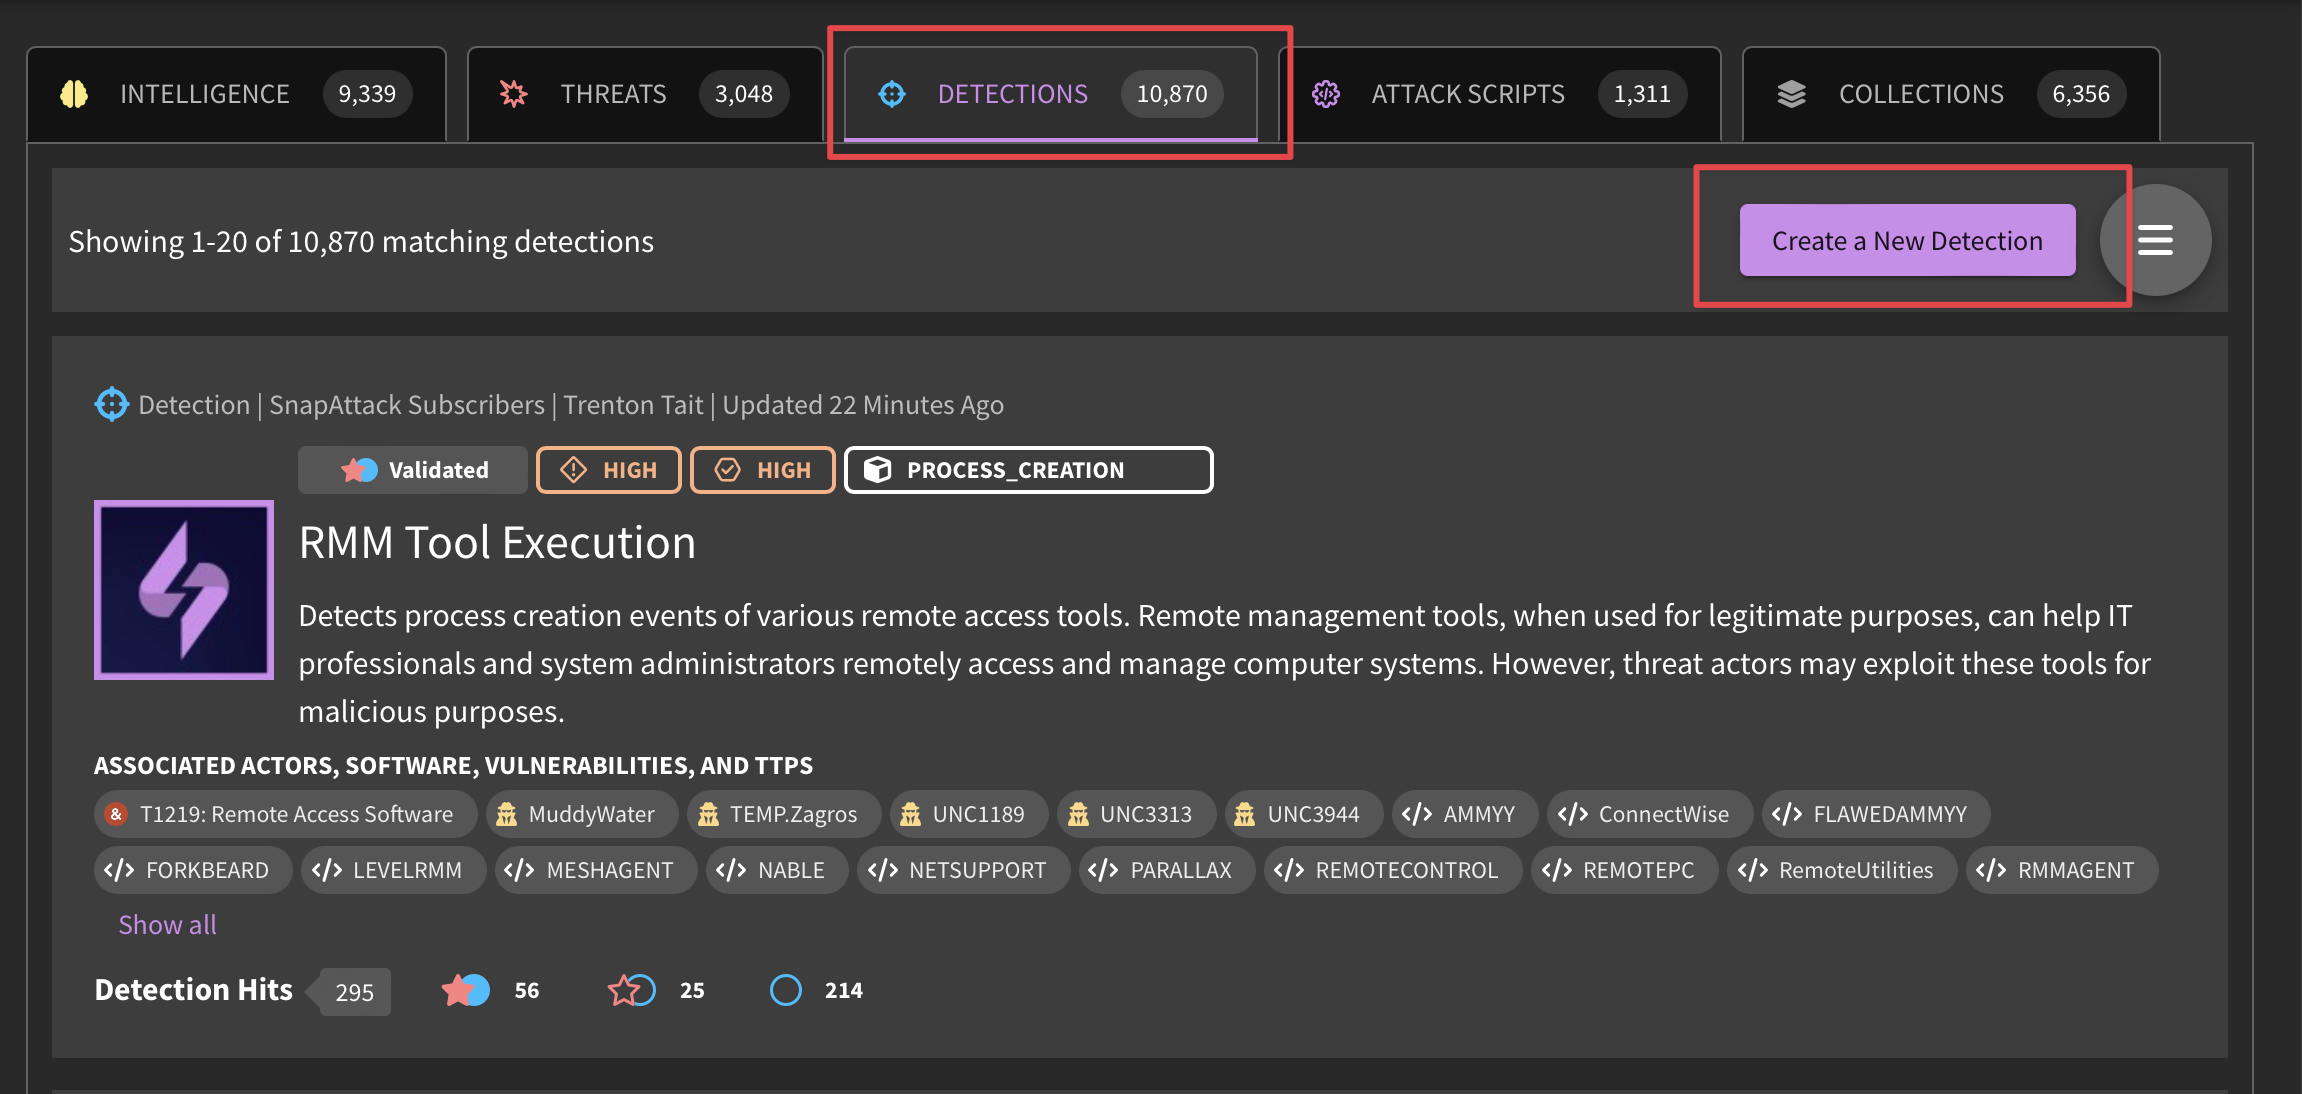
SnapAttack maintains a library of over 8,000 behavioral detections, with regular content updates, that provide high-quality detection logic which can be filtered down to ready-to-use, validated detections. The content within the Detection Library is accompanied by a no-code detection builder which provides platform users with an "easy button" way of translating syntax between tooling. The SnapAttack detection library also acts a repository for your organization's pre-made behavioral detections, referred to as "native detections".
Common Use Cases
Detection content is relevant to various teams within an organization as threat intelligence, defensive, and offensive teams play a part in the detection development lifecycle.
- Threat Intelligence: Understanding how the behavioral patterns (TTPs) are employed against a victim's environment will assist CTI teams in further contextualization of the threat.
- Detection Engineering: Engineers can track what detections have been deployed (and to which tooling), quickly build out new detections (using the no-code interface), and view related logs that have matched against the detection logic.
- Threat Hunters: Once detections are created (either by SnapAttack, the community, or your team), threat hunters can then kick off their searches knowing that the logic is pre-validated, and that zero hits means a threat is not present in your network.
- Red Teams: Offensive teams can use the detections to hone their techniques to remain undetected, as well as identify detection opportunities from known threat activity.
Detection Development Lifecycle
Detection opportunities can arise following investigative efforts using threat intelligence reporting or post-red teaming activities. Below is an example of how detection content would appear in various stages of the development lifecycle:

Below are a few suggested workflows using the SnapAttack platform depending on where detection opportunities have been identified:
Recommended Workflows
Sourced from Threat Intelligence
Offensive Teams
- Review Intelligence (SnapAttack or Open Source Intelligence) → Capture a threat (to test the behaviors/TTPs) → Develop attack script → Run attack simulation on client host (to validate the detection's effectiveness) → Relay results to SOC
Defensive Teams
- Review Intelligence (SnapAttack or Open Source Intelligence) → Develop detection content (to alert on the behaviors/TTPs) → Deploy detections → Confirm alerting response in existing tooling (to validate the detection's effectiveness) → Tweak as needed (e.g., False Positive Reduction via IDE)
Sourced from Post-Red Teaming Exercises
Offensive Teams
- Complete red teaming exercises → Share results with Security Operations Team (via Collections) → Develop attack scripts → Run attack simulation → Relay results to SOC
Defensive Teams
- Review results of red teaming exercise → Determine detection gaps → Develop detection content → Deploy detections → Rerun attack simulation and confirm alerting response → Tweak as needed (e.g., False Positive Reduction via IDE)
Create and Edit Detections
For a full walkthrough on how to create/edit a detection, check out our tutorial below.
Creating Sigma Detections
SnapAttack uses the open-source Sigma detection specification for creating detections. This allows the majority of detections to be written once in a vendor-agnostic manner, that can be translated to one of many supported integrations (e.g., Google Chronicle, Splunk, Elastic, Microsoft Sentinel, CrowdStrike, SentinelOne, etc). A lot of engineering effort has been focused on making Sigma "enterprise-grade" and building the necessary infrastructure to operationalize it in production SOCs.
User can learn more about Sigma from the following resources:
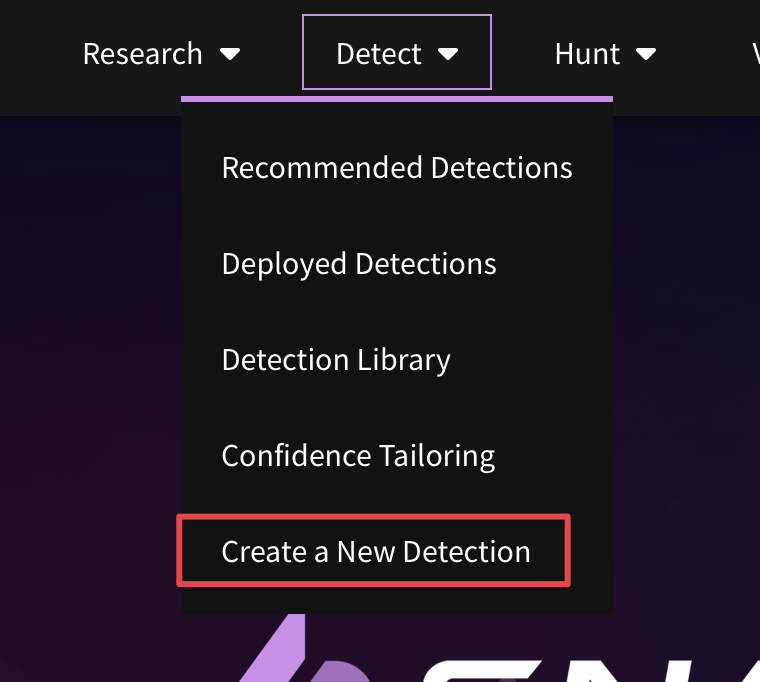
Sigma is the default language option in the Detection IDE. Users can create a new detection by selecting "Create a Detection" from within Detection Library or from the drop-down menu.
Another way users can create detection content is by pivoting off of ready-made detection logic (to tailor to an organization's needs), using behaviors identified in a threat intelligence report, or by creating a detection from captured threat activity.
For example, to create a detection based on a captured threat, you would navigate to "Sandbox" → "View Threat Library", and use the applicable search and filter options to identify a relevant threat. From there, you would click on a threat and scroll to the timeline below the video. A user can identify a malicious event from a labelled attack (red star), the process graph, or the event logs. From one of those event logs, You can click "Create Detection" to pivot over to the detection IDE, which will bring the relevant log (if applicable). A user can select relevant fields and values from the target log on the right side of the IDE, fill out the detection details (title, description, ATT&CK mapping, etc), then hit "Save" and "Publish" to make it live in the system.

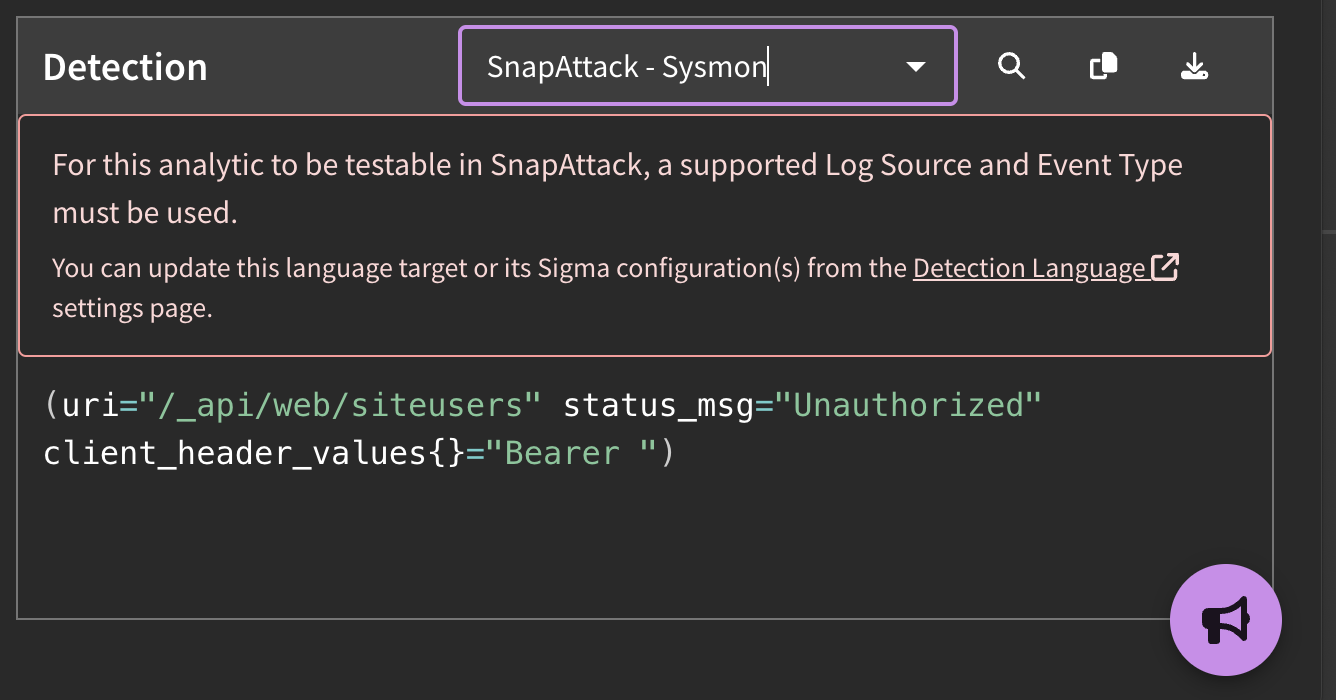
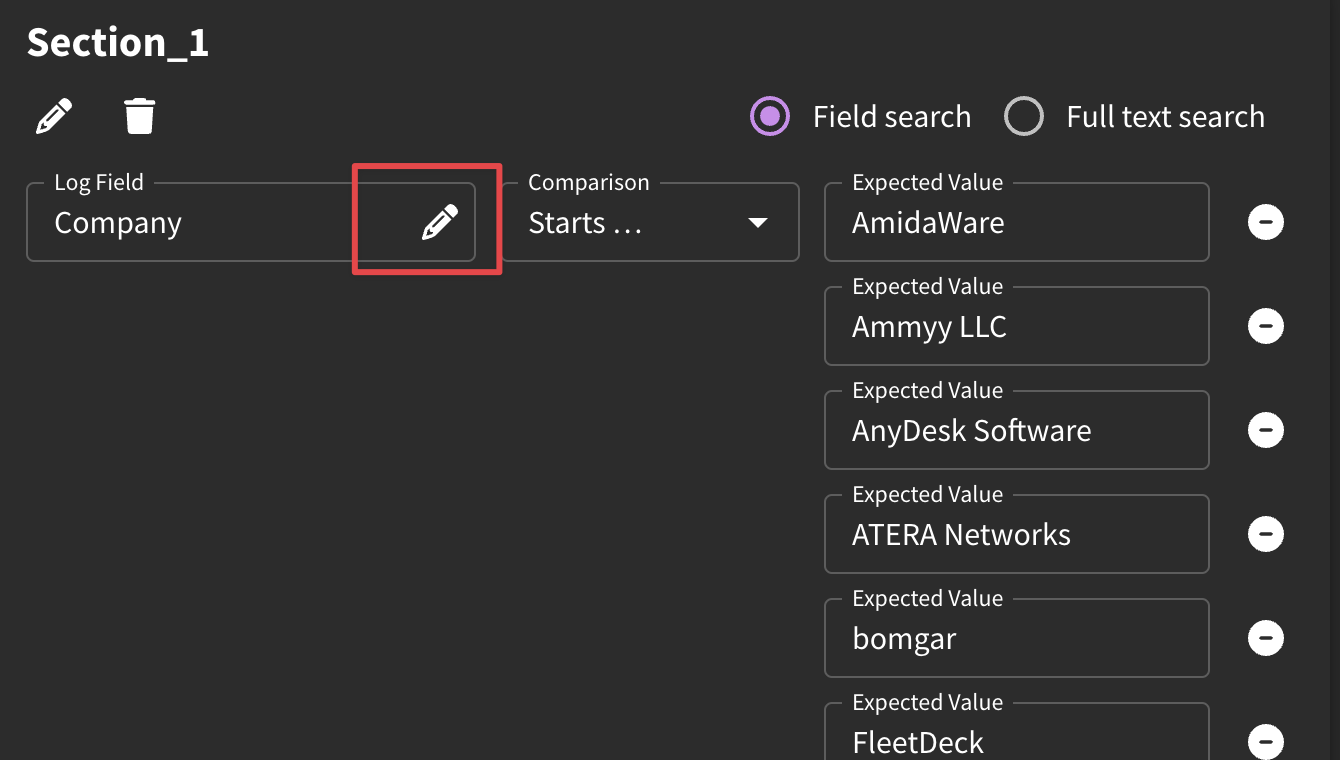
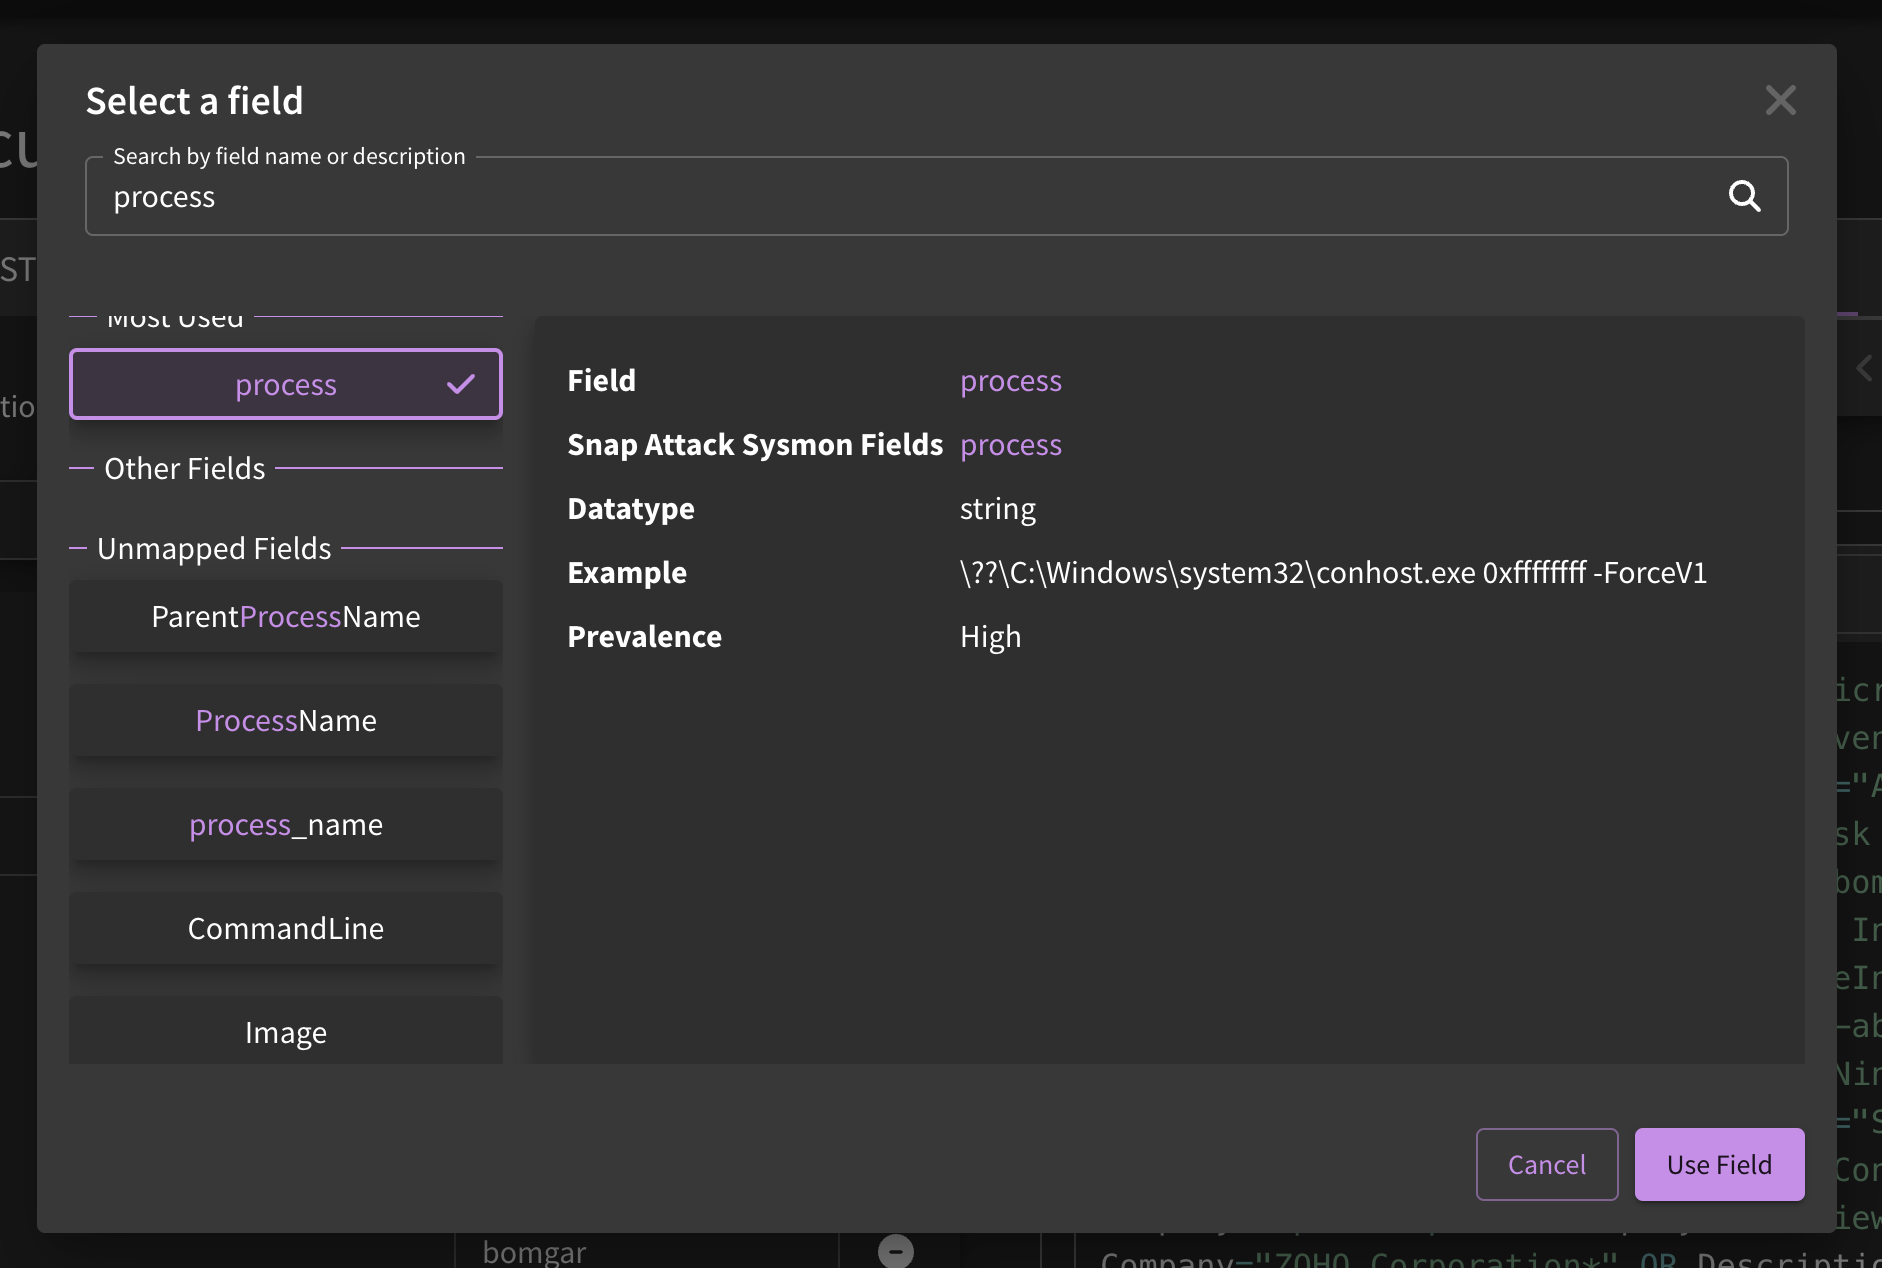
For user unfamiliar with Sigma, creating detections can be a bit overwhelming at first. For example, EDR detections will use the open source Sysmon field names. Behind the scenes, Sigma maps these fields to the target language (e.g., CrowdStrike, Chronicle, etc). If you aren't sure what field to use, you can browse the fields by using the pencil icon to better match up against the syntax your target language uses.
Creating Native Detections
SnapAttack users have the ability to upload existing detections that have already been developed based on the needs of their organization. These are tracked as "native detections", which would be stored in an integration's specific language or syntax. For example, Google Chronicle supports Yara-L, Splunk supports SPL, and CrowdStrike supports their Custom IOA syntaxes. While these detections will be added to the detection repository, they are private to the publisher's organization.
To upload an individual native detection, select "Create a Detection" from within Detection Library or from the drop-down menu → Select "Native Detection" within IDE → Select target language within IDE → Fill in detection logic → Click Publish Detection.

Native detections can also be ingested in bulk via a configured integration. This will sync detections that are already created or deployed in a customer's environment.
SnapAttack provides the following benefits for native detections:
- Version control and history; review who made specific changes to a detection's logic over time
- MITRE ATT&CK mapping, and tagging for threat actors, malware/tools, and vulnerabilities
- The ability to track specific metadata (e.g., remediation steps, use cases, etc.)
- Reporting
Editing Detections
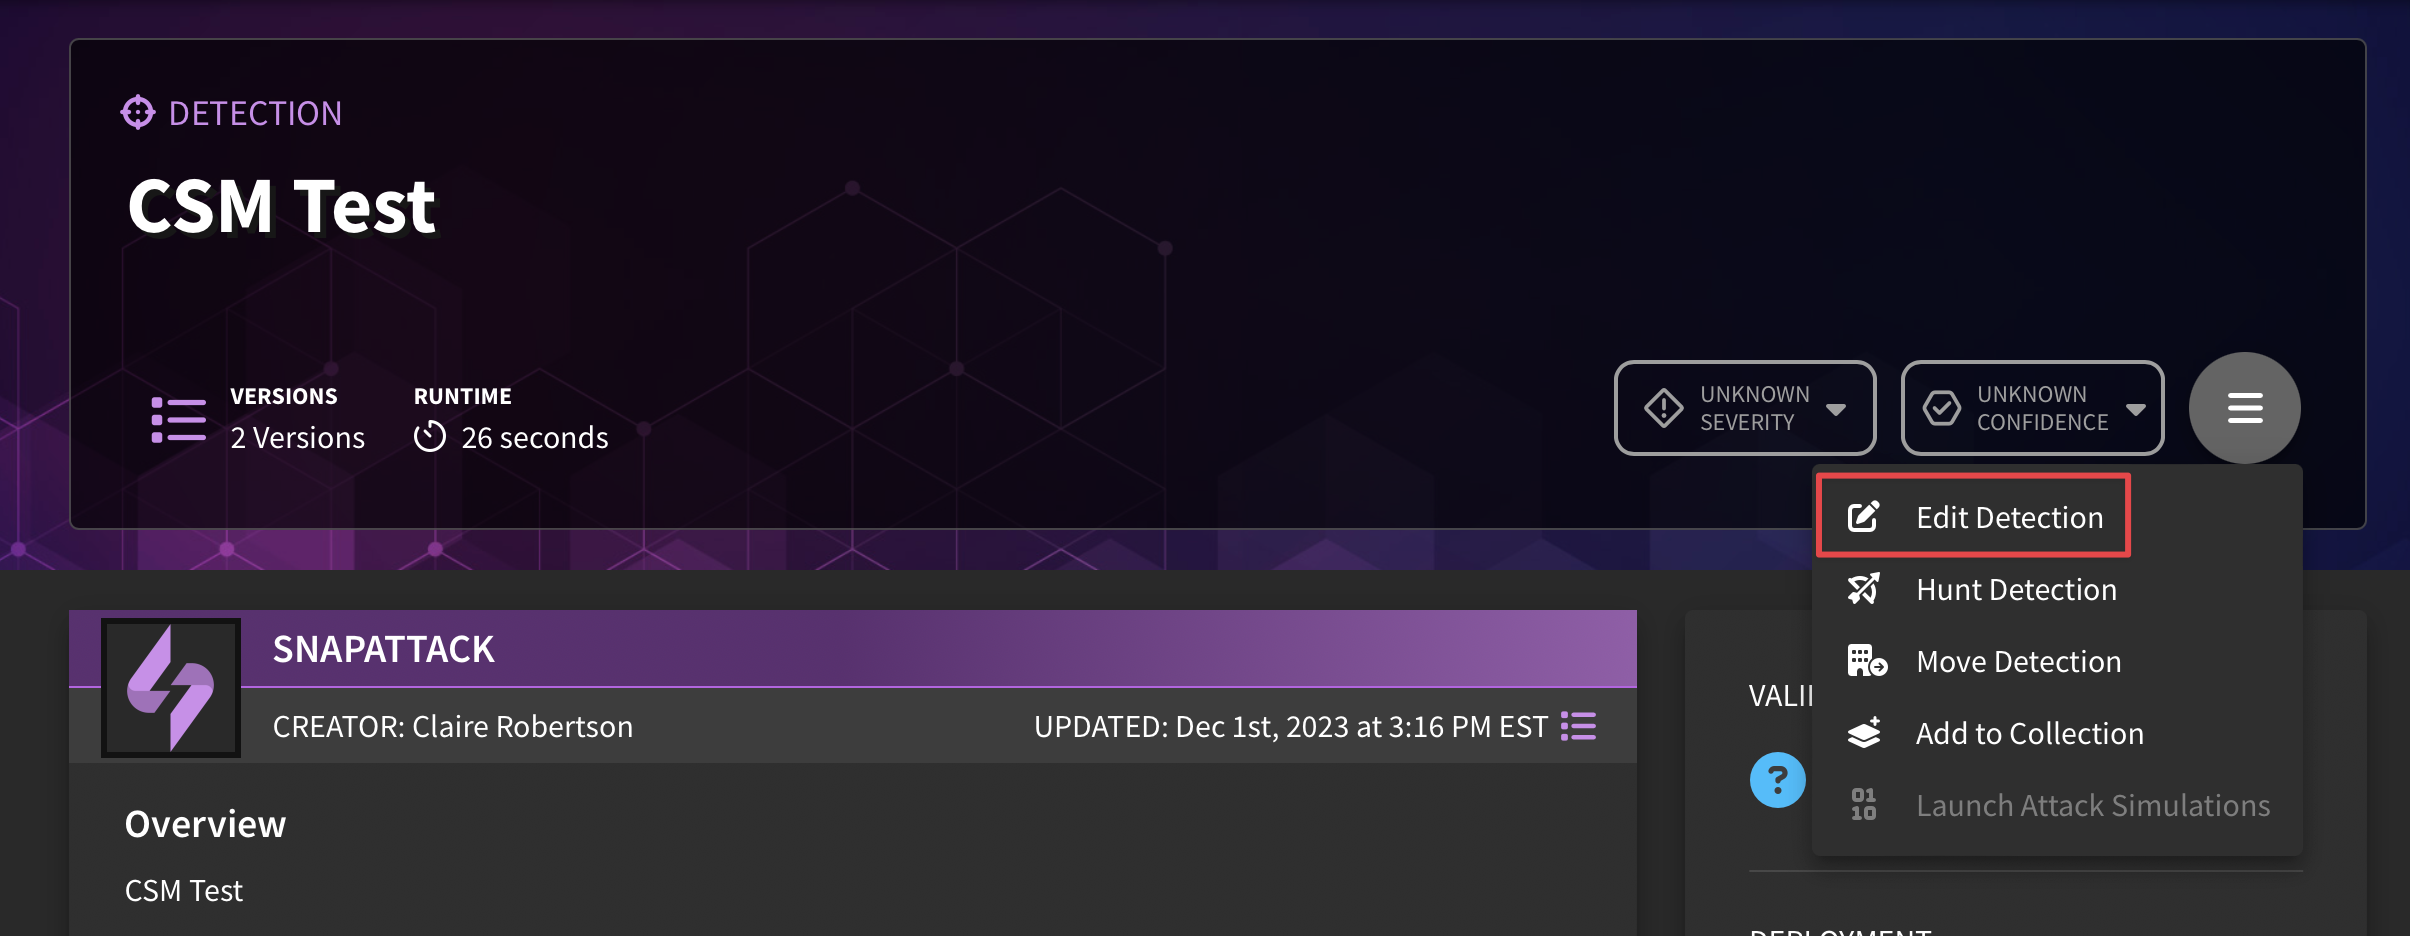
SnapAttack allows users to edit detections that they don't own, such as subscription or community detections in the platform. To bring up the edit workflow, a user can navigate to an individual detection page, click on the hamburger menu option and select "Edit Detection".
- If an organization owns the detection, they can edit everything, including the title, description, tags, and all detection logic.
- If an organization does not own a detection, they may only be able to edit specific fields on the "Customization" tab, such as false-positive reduction or tuning logic. If an organization wants to make further changes, they can click the clone button in the IDE to clone the detection.
Generally speaking, most users do not want to clone a detection if it can be avoided. This allows the maintainer (e.g., SnapAttack or community) to make updates to the base detection, ATT&CK tags, and other aspects and the user to get those updates for free. If a user clones the detection, they will be notified if the parent detection has had updates or modifications, but will have to manually determine if those should be brought over to their copy.
Some detections, specifically native detections that do not support customization or false positive reduction, can only be cloned.
Detection Validation
Validating a detection refers to the process of confirming the hypothesis that a possible threat event is truly an indicator of maliciousness by testing it against a known threat. That is, a validated threat is considered a "true positive"; the detection is hitting against known threat activity.
In this way, the easiest method to validate a detection is to run it against an already-published threat. Look at the symbols notating (un)detected threats. If there is both a filled-in blue circle and red star, that means that your detection landed closely to the ATT&CK-tracked threat which means it detected that threat (and is thus, validated!)
To validate a new detection, navigate to "Sandbox" → "View Threat Library", select a threat and scroll down to threat timeline table or process graph and click "Create a Detection". Create the detection in the IDE and then select "Publish". Validation occurs automatically if detection matches up to threat activity. See validation criteria and validation status for more details on how validation works.

The right-most symbol will prompt you to create a new detection based off of an event log. For a more precise detection, create your detection from the process graph.
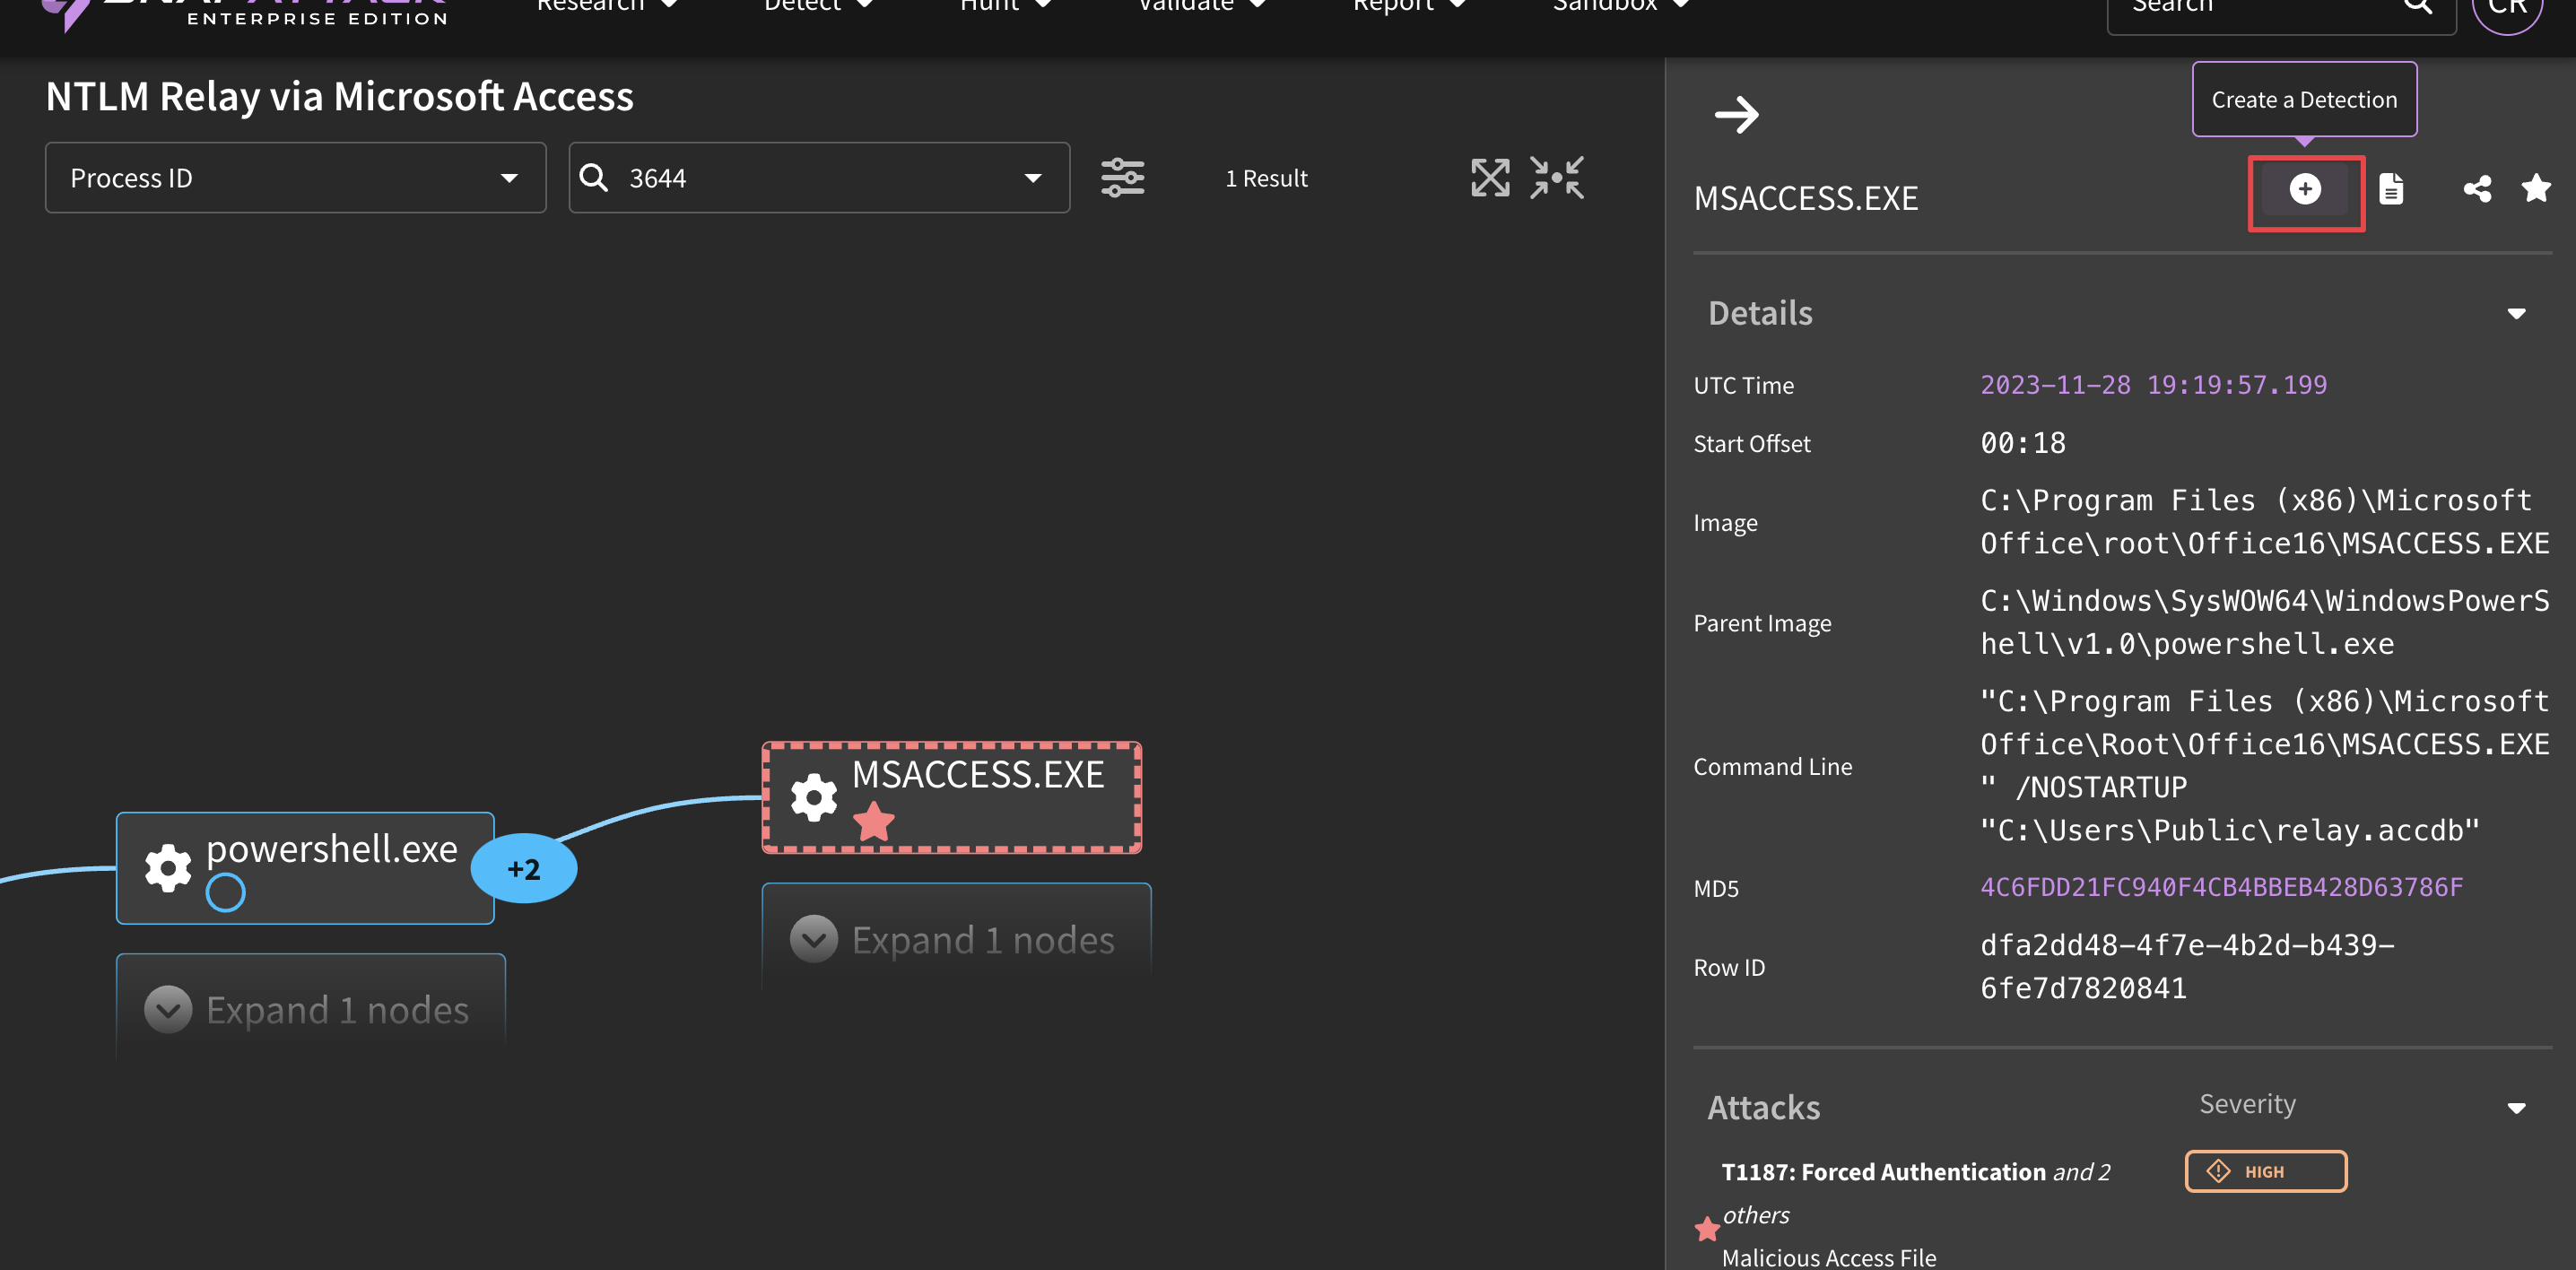
The process graph illustrates the chain of events leading up to and after the threat activity.
Deploy Detections
For a walkthrough on how to deploy detections, either individually or in-bulk, please refer to our tutorial here!
Individual Detections
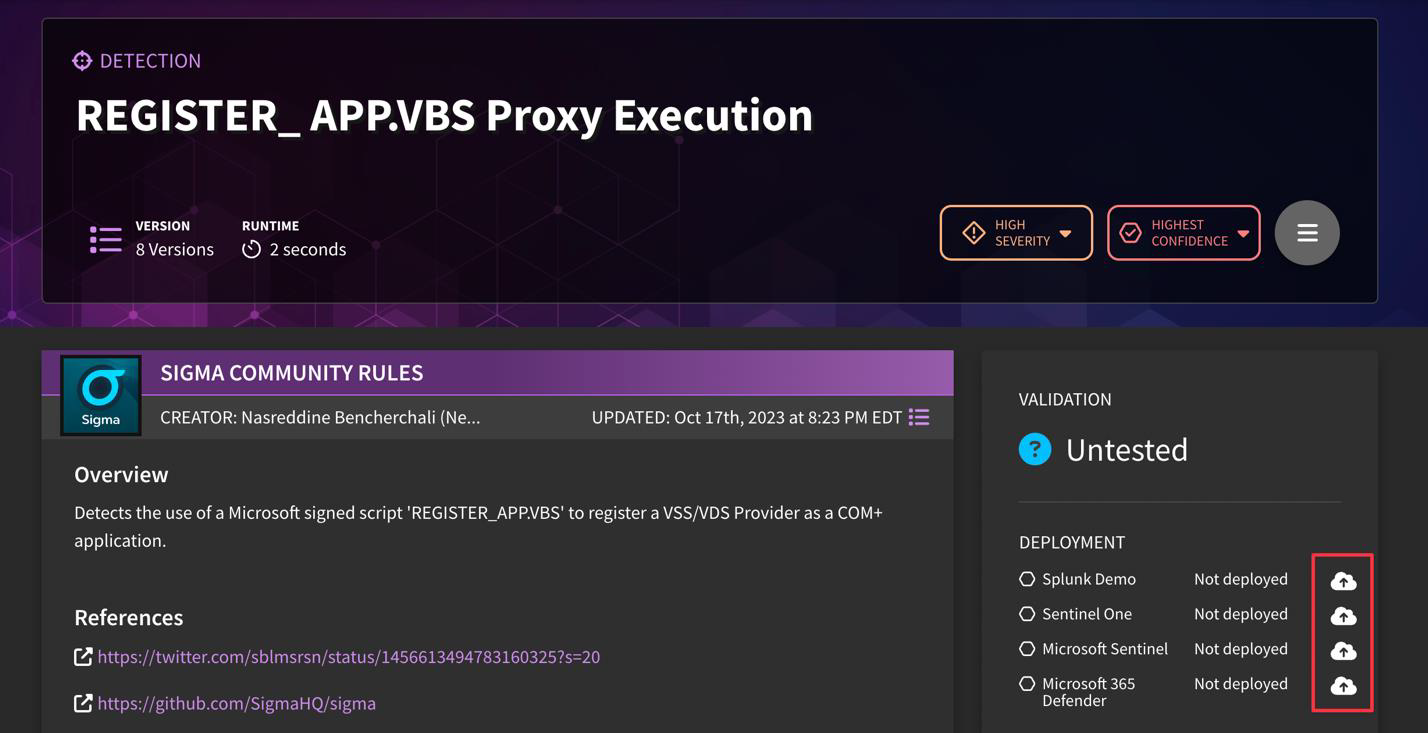
To deploy an individual detection, navigate to "Detect" → "Detection Library", click on a detection, then click the "Deploy Detection" button on the right sidebar.
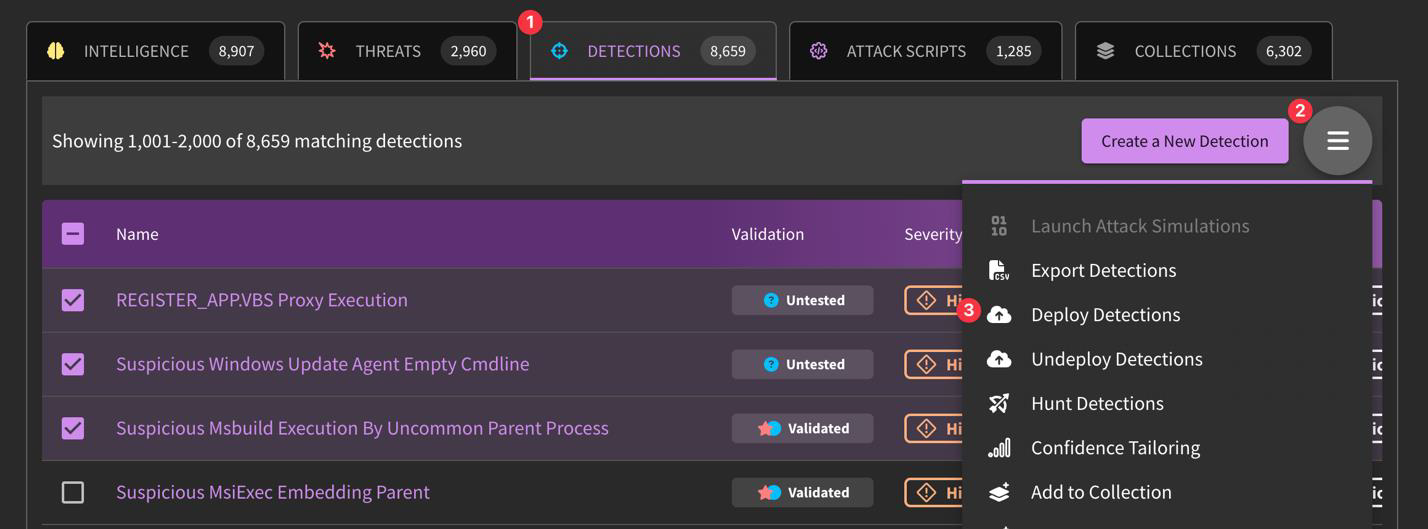
In-Bulk
To deploy multiple detections at once, navigate to "Detect" → "Detection Library", click on "Grid View" in hamburger menu, filter or select the desired detections, then click "Deploy Detections" in hamburger menu and select the integration(s) to deploy to.
Tuning Detections
As part of the Detection Development Life Cycle, it is sometimes necessary to tweak existing detection logic to ensure that the detection is firing on appropriate activity. To do so, there are a few ways in which you can engage in the tuning process.
Changes to the detection's false positive or tuning logic can be done to any detection in the system. In order to tune a detection, simply navigate to that detection's page, click on the hamburger menu, and select "Edit Detection". SnapAttack's built in IDE has expanded to include the "Customization" tab, which allows users to append additional syntax to the original detection content to create exclusionary language, without the need to fork off a different version of the detection.
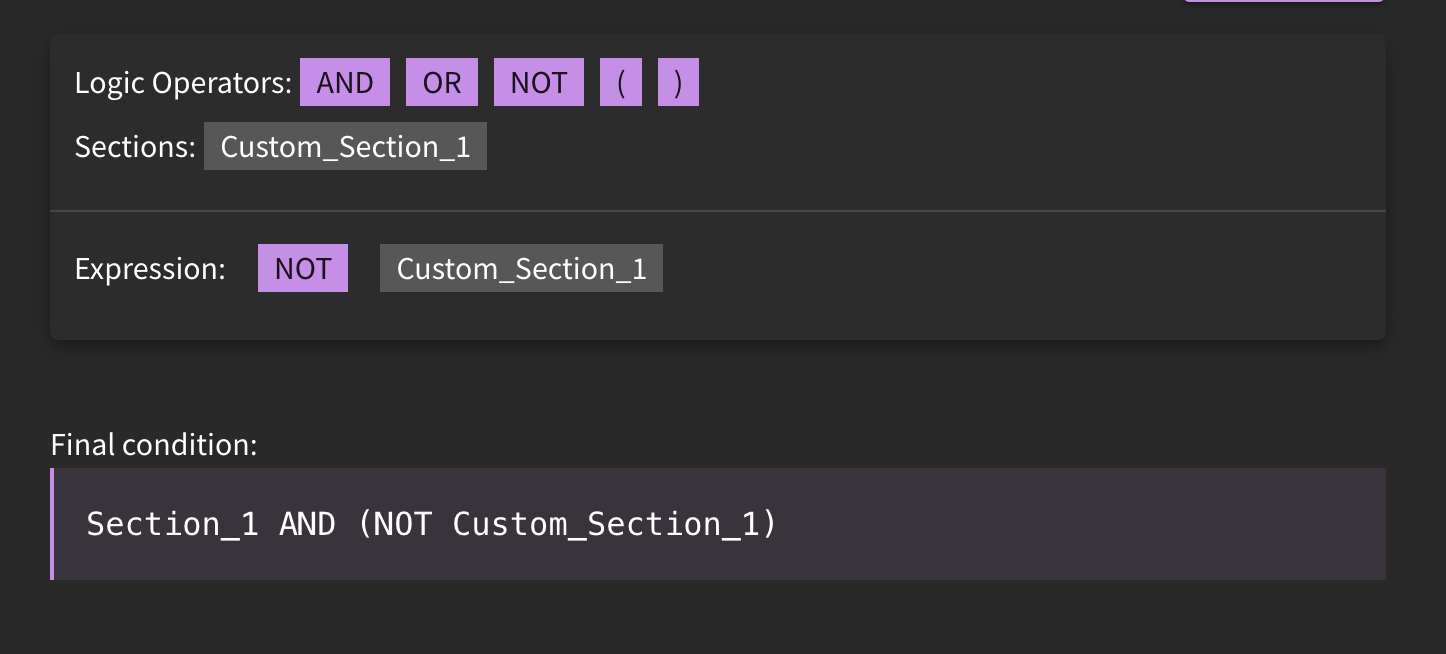
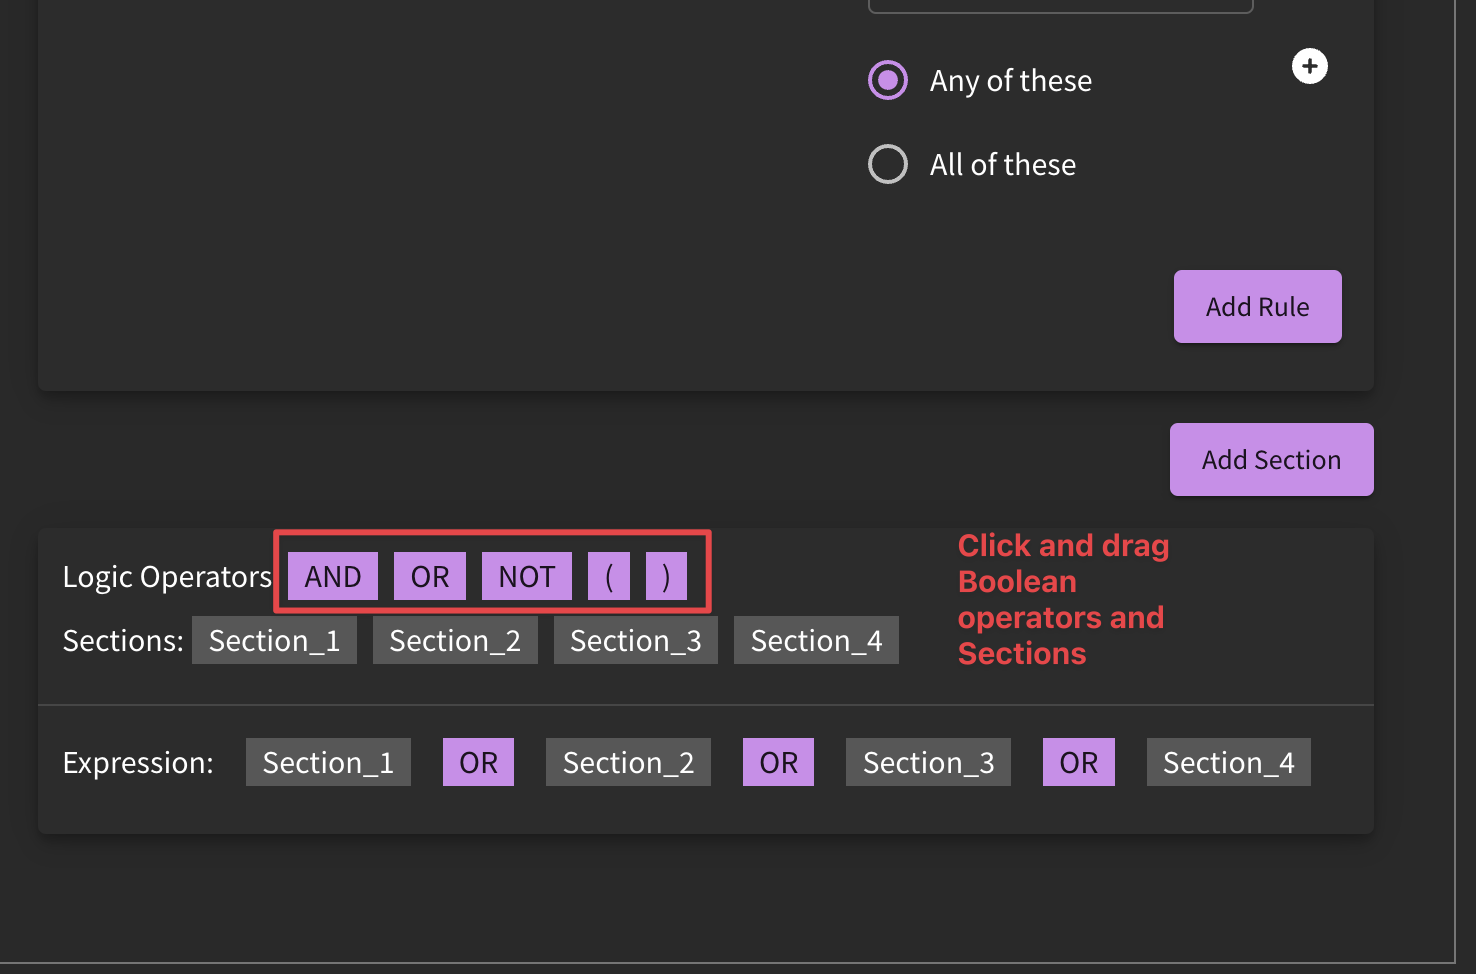
In some instances, it may be advantageous to edit the original base detection. Users would follow the steps described in editing detections, and would either edit the detection directly if it is owned by their organization, or create a clone of the detection if it is not. From here, a user could create additional sections and use logic operators to perform more advanced tuning.
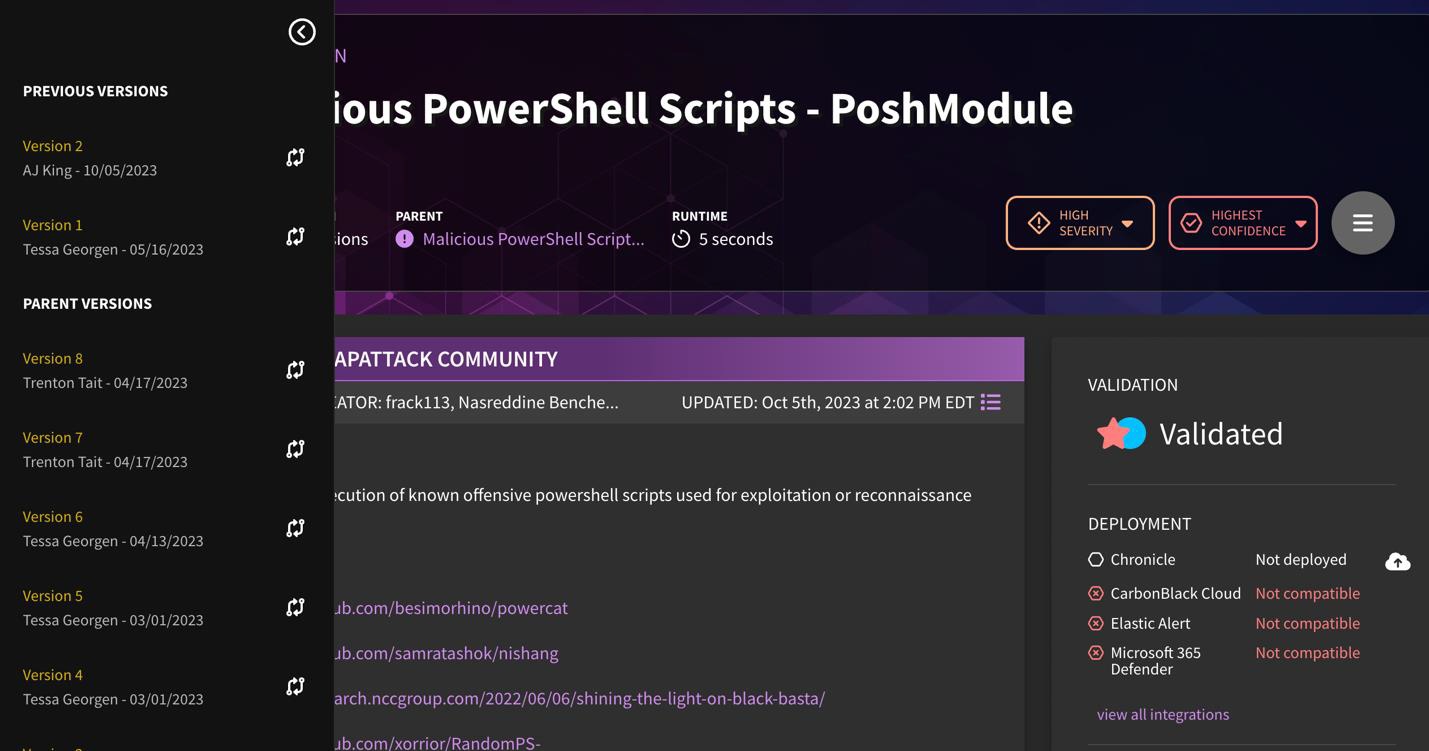
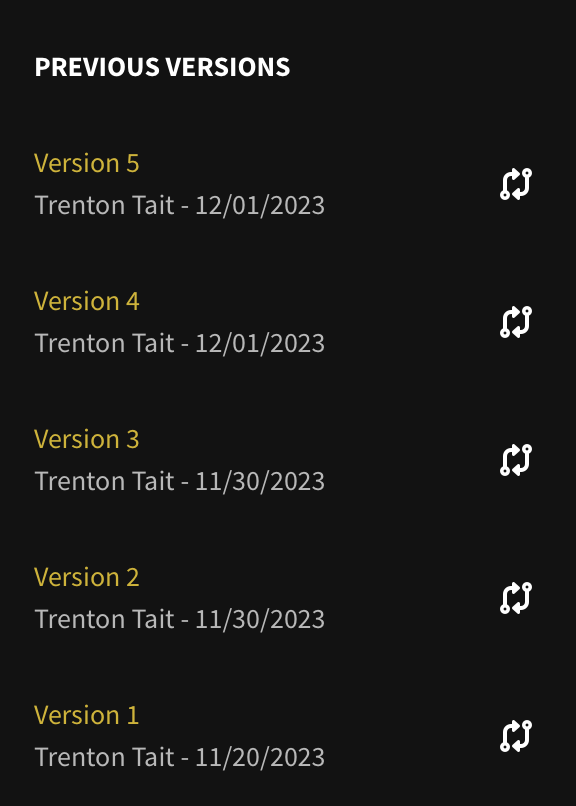
Version Control
SnapAttack users can track version history and lineage of detection content by looking at the version number being displayed in the hero banner. If a detection was cloned from another detection in the library, that linkage is now displayed. This helps users determine if a parent detection's logic has been updated, and if they want to bring that over to their forked version. Users can use the built-in diff viewer to show changes in the detection logic across versions.
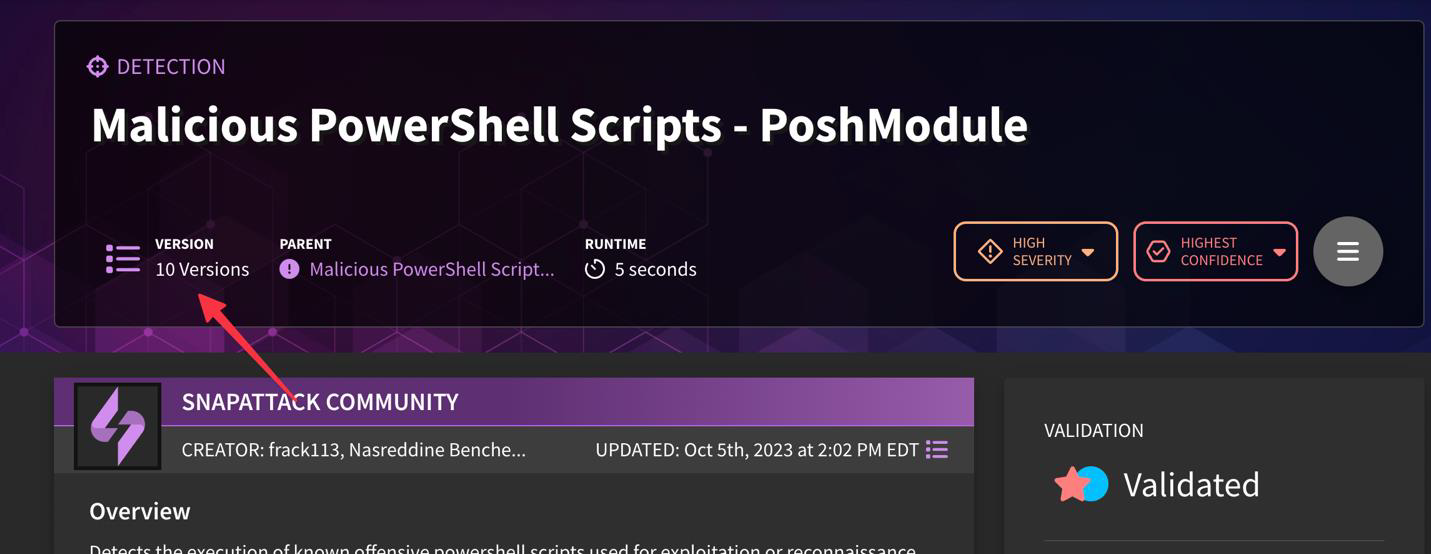
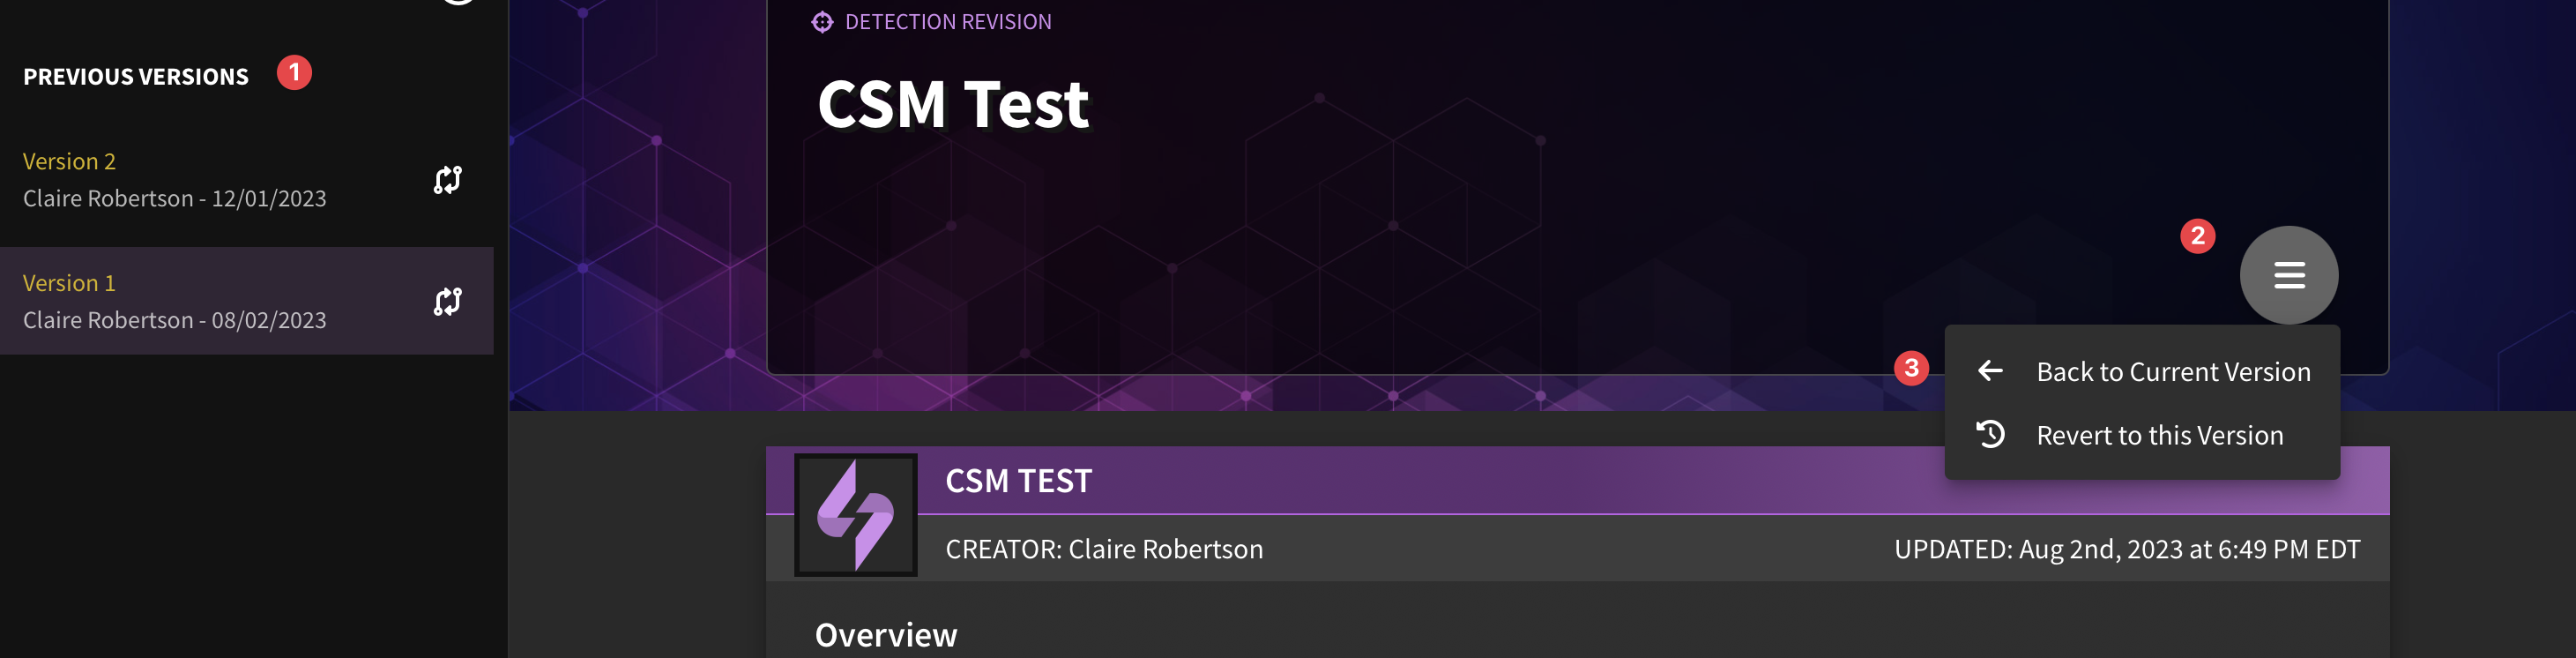
Note that the author and date of versioning is taken into account on the left-hand panel.
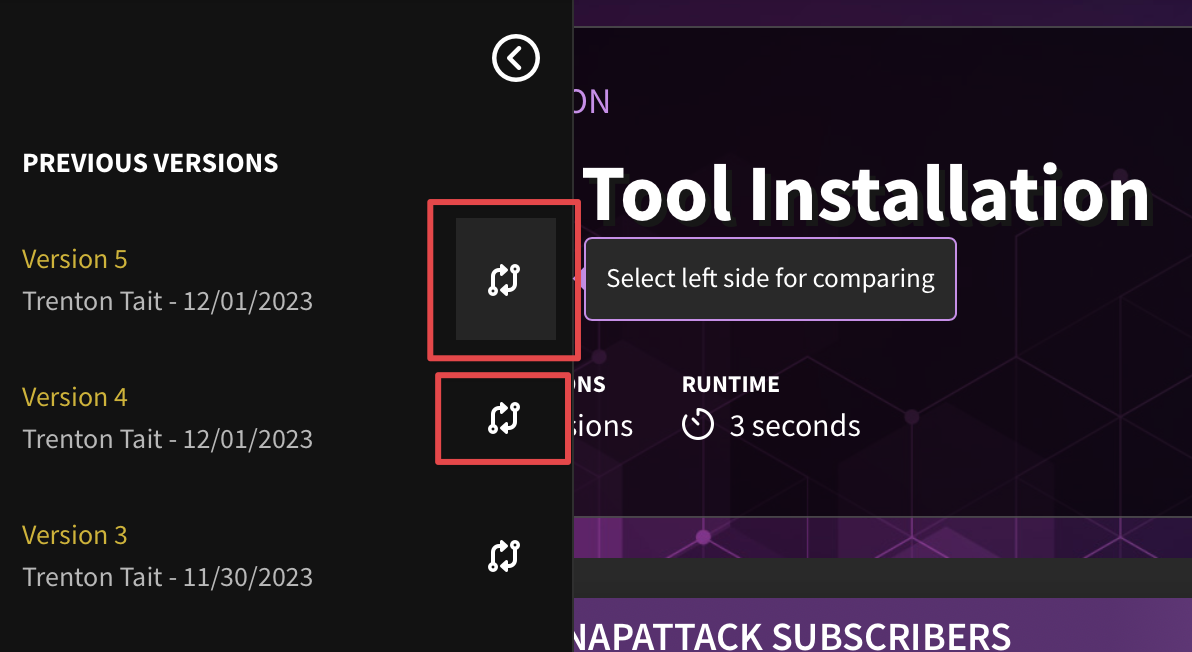
Version Comparison
Sometimes, it is necessary to understand what has been changed between versions. To compare, click on the arrow icons to pull up side-by-side views. Deleted content will appear in red, while content that has been added in will be blue.

Revert to Original/Different Version
If you need to revert changes back to another version, click on the hamburger menu from the version tracking tab. Note that you will need to be the owner of the detection in order to revert changes.
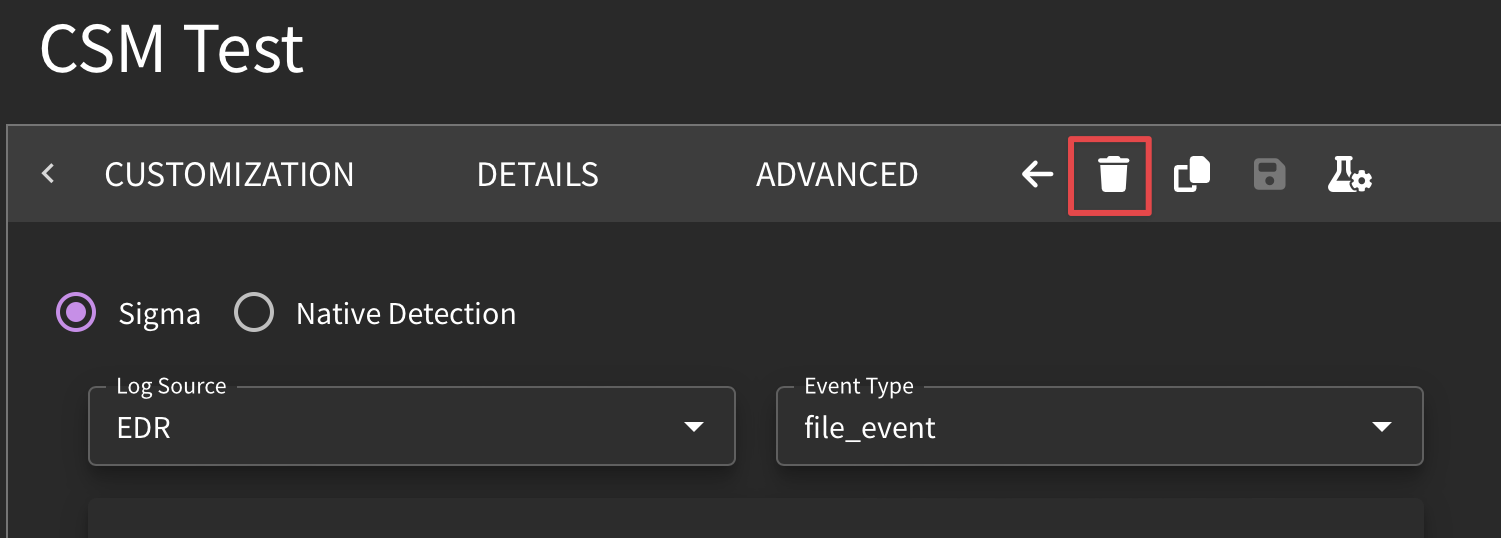
Delete Detection
Sometimes you may want to get rid of a detection, and that's ok! You will need to be the original owner of the detection before you can delete it. Navigate to the IDE and click on the trashcan ion. Note that if this detection is deployed, it will be undeployed before being deleted.
Other Resources
Integrations
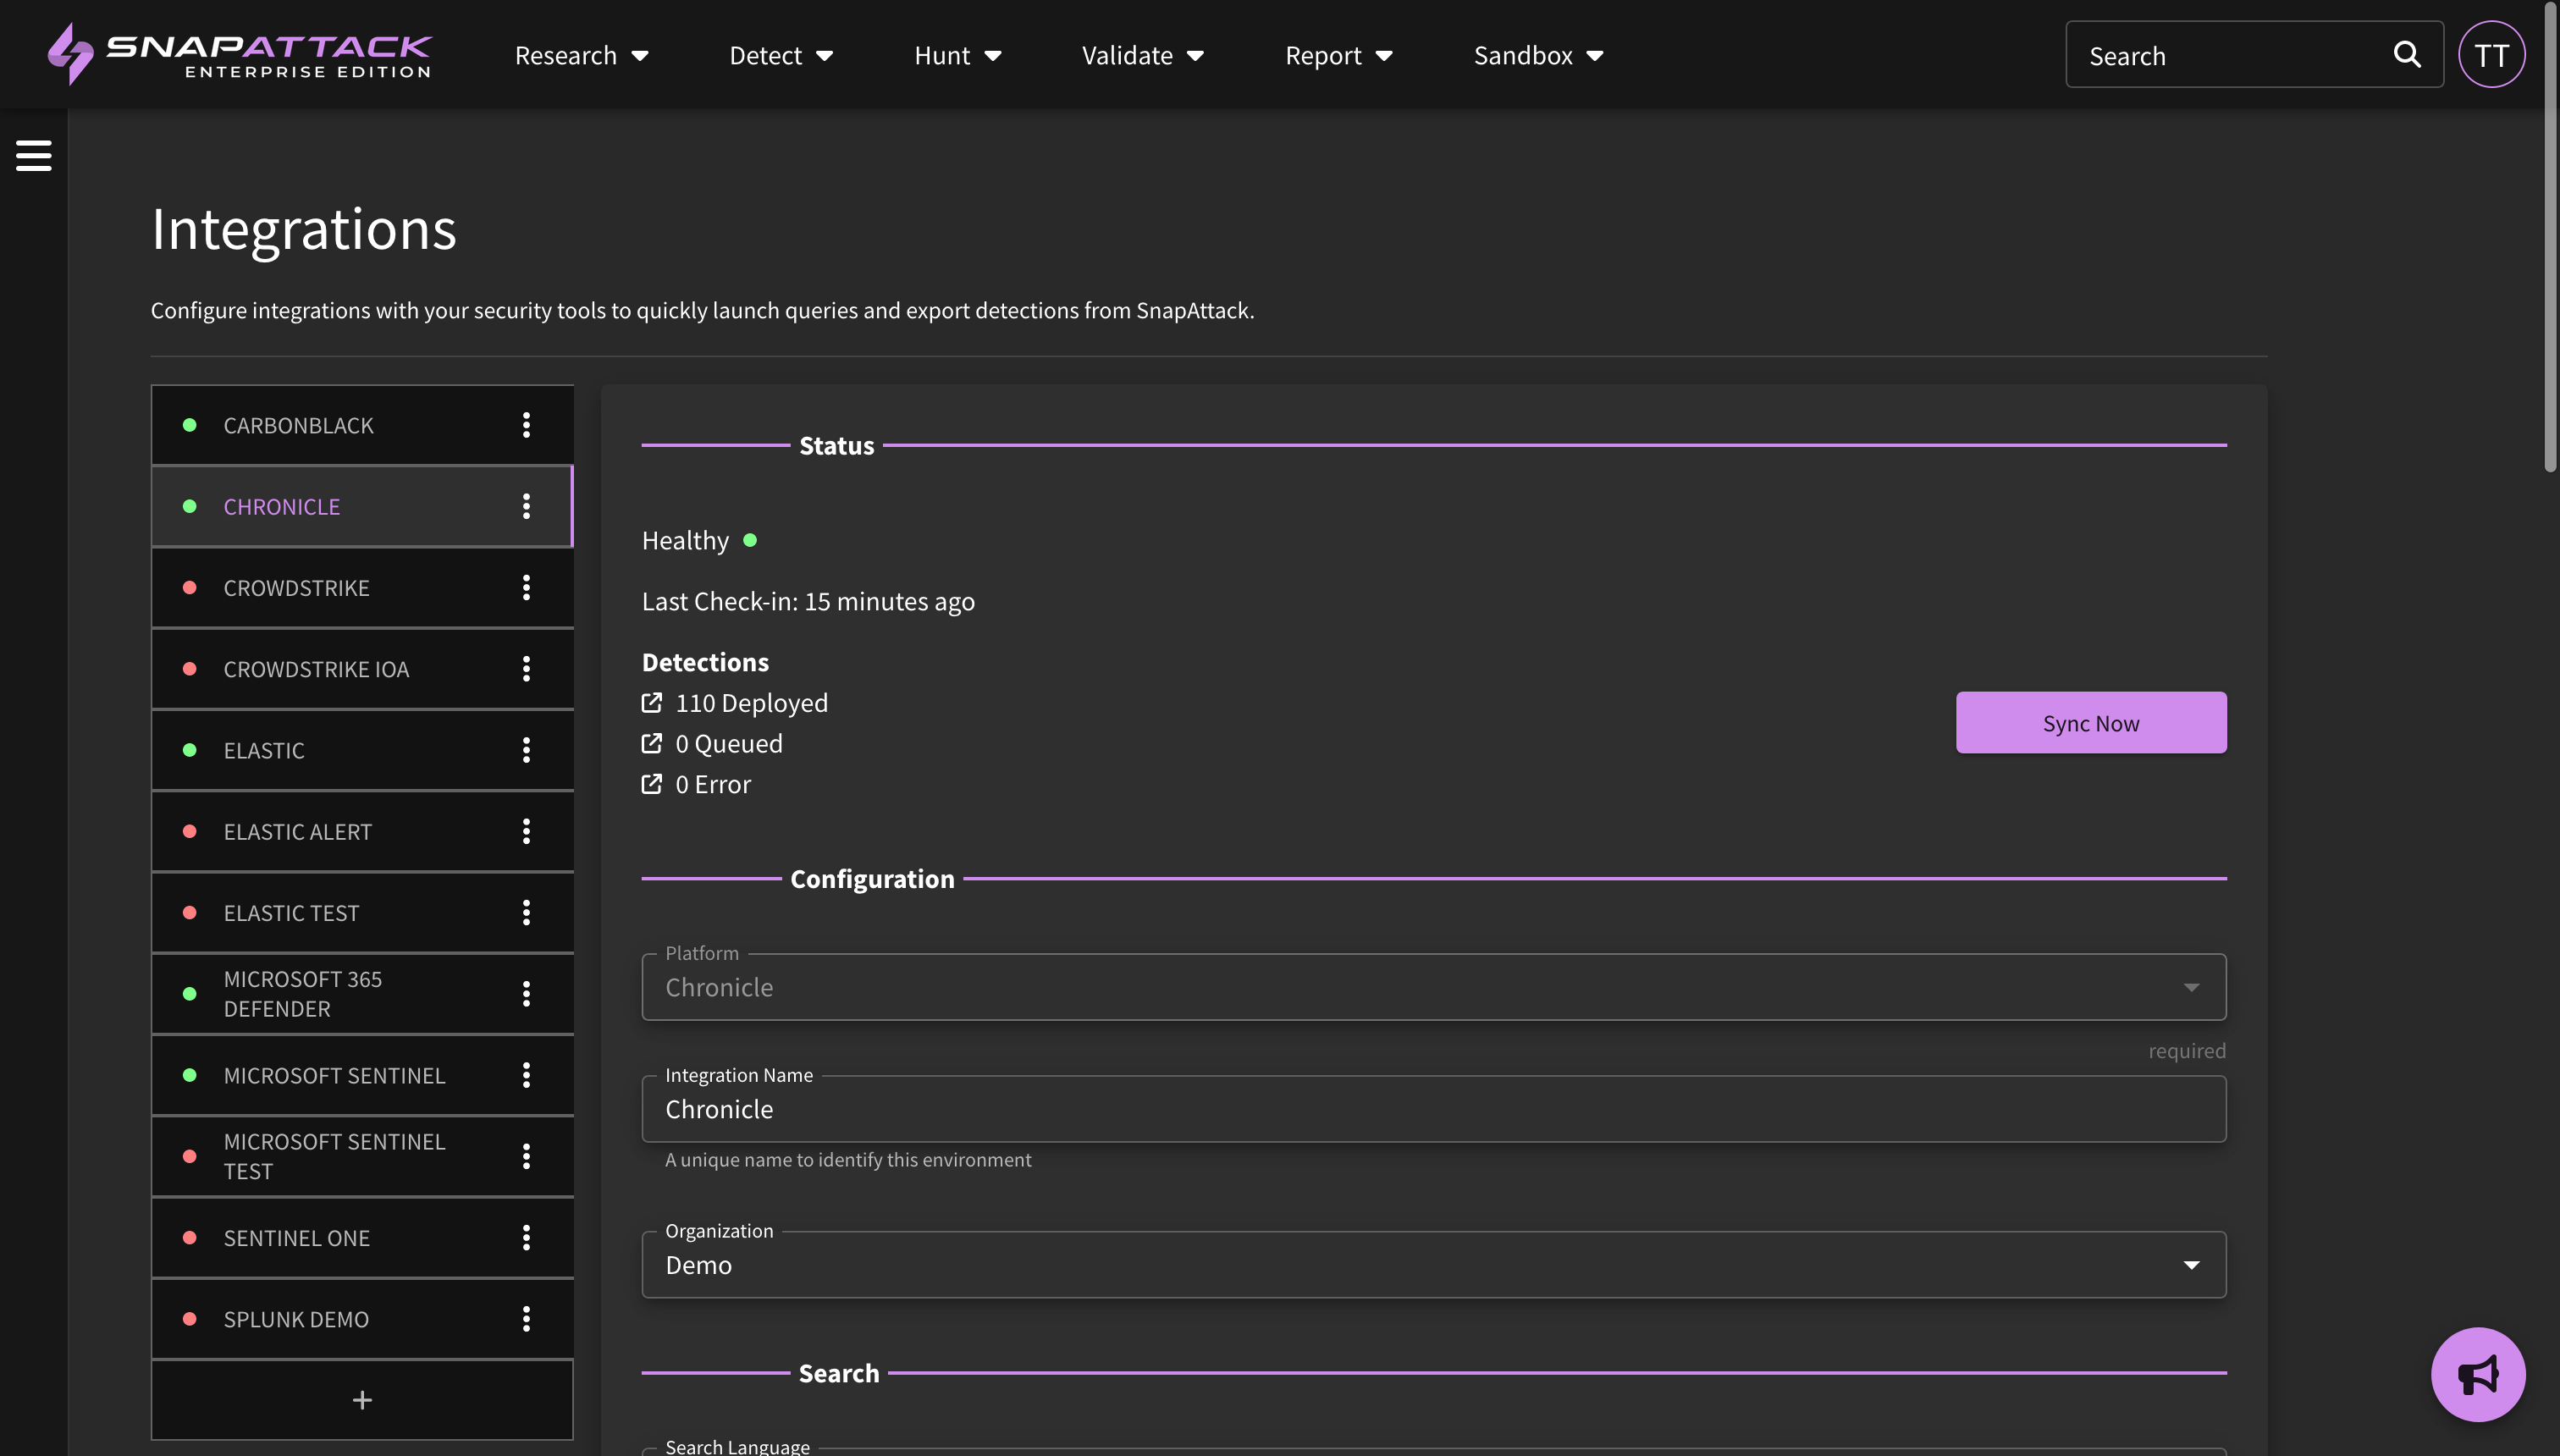
If your organization has integrations configured, you can take note of their health, the status of deployed detections, and configure additional integrations (if you have permissions to do so) through the Integrations tab (here). For more on what integrations are available, refer to Settings.
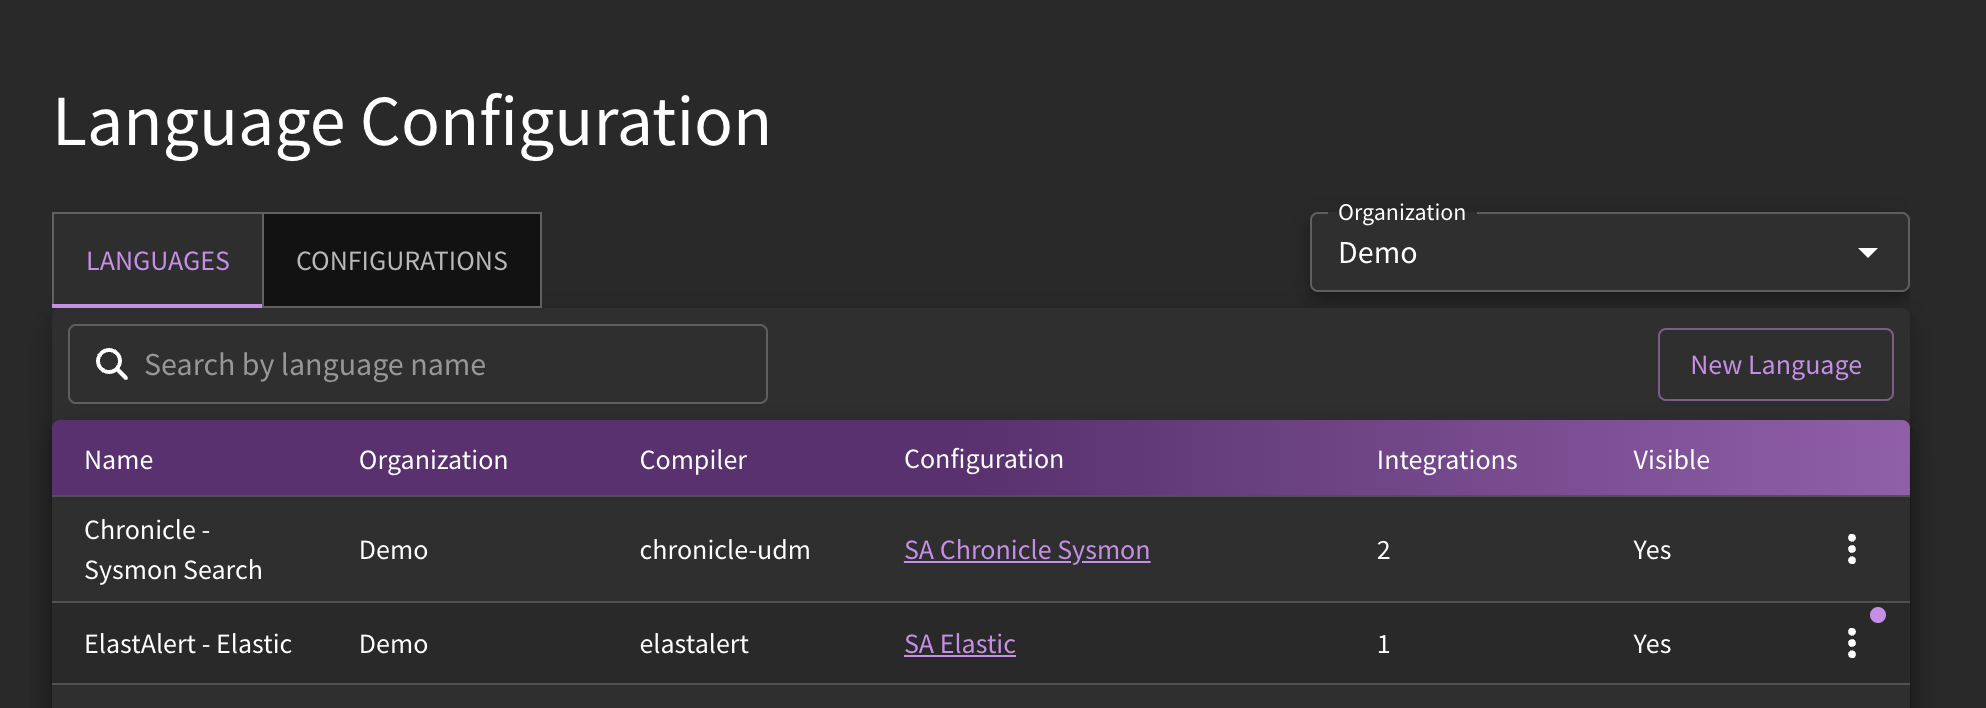
Field Mapping
Sometimes it is necessary to alter the field mappings of your target language. You will know if this needs to happen if there is an error message when building out your detection content. The Language Configurations tab can be accessed (here). As field mapping alterations are relatively advanced, we suggest reaching out to the SnapAttack team for direct assistance.